It is getting very exciting now, only two weeks to Christmas! This week according to the Christmas Preparation Plan, I was working on the actual plan for Christmas Day and our other family Christmas Lunch. This is a work in progress and I will publish my final plan next week.
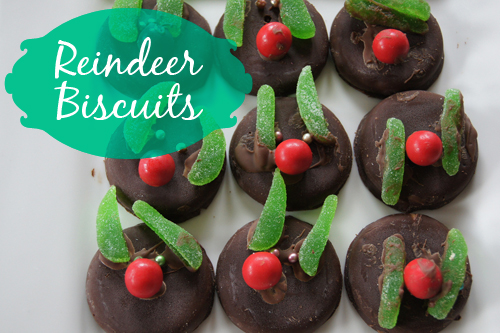
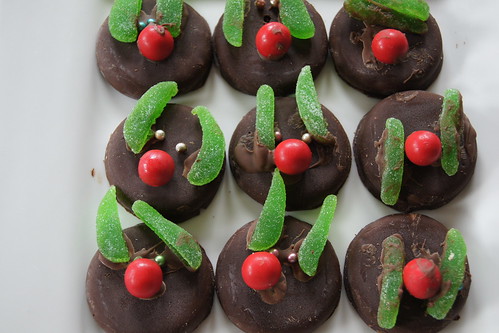
I have jumped ahead to Christmas Biscuits. I will be making traditional short bread, but I though rather than sharing that recipe, I would share a great recipe for a Christmas Reindeer Biscuit that the children can make.
Again, I cannot take credit for the originality of this biscuit, but was inspired by another clever mother at my boy’s school (there is lots of them there!). Little Rascal had a Christmas celebration with his class on Wednesday and wanted to make the Reindeer Biscuits to take and share. So he and Thinker patiently and enthusiastically worked for about 45 minutes to make 26 Christmas Reindeer Biscuits.
When made by adult hands they look a little neater and more uniform, however I love the fact that my boys are willing to and actually spend the time in the kitchen to make these biscuits. I avoid intervening or correcting their work as their effort, is more important to me than a perfect Christmas Reindeer Biscuit!
Ingredients
- 2 packets of Mint Slices. Or in our case we just used the home brand equivalent, which is half the price and children love to eat just the same.
- 1 packet of Jaffas
- 1 packet of Mint Leaves – cut in half.
- 1 packet of Mixed Cachous. (These are the little silver balls used for cake and cookie decorating.)
- 1 cup of chocolate chips – melted, this provides the glue to stick all the parts together.
(1). Setting Up.

To make this as simple and mess free as possible for the children, I have found that setting out the biscuits and the ingredients in an organised manner, makes it a bit easier for them.
(2). The nose.

We melt the choc chips in a tea cup and use a paint brush to apply the chocolate to the mint slice.

Then press the Jaffa lightly onto the melted chocolate to stick the nose to the biscuit.
(3). The Eyes

Using the paint brush again, the children put a two little blobs of melted chocolate on the biscuit and place the cachous on gently for eyes. It is better to place the eyes close to the nose with a narrow gap, as this leaves more room to stick on the mint leaf antlers.
(4). The Antlers.

Using the two halves of a mint leaf, paint the larger end of the leaf with chocolate and then stick it onto the mint slice.
(5). The Finished Product

Once the antlers are on, you have your finished product! A tip with the melted chocolate is to make sure that you re-melt it through out the process, so it is a good thin consistency. Younger children also need their brushes rinsed regularly to prevent excessive build up of chocolate.
Have fun!
- 2 packets of Mint Slices. Or in our case we just used the home brand equivalent, which is half the price and children love to eat just the same.
- 1 packet of Jaffas
- 1 packet of Mint Leaves - cut in half.
- 1 packet of Mixed Cachous. (These are the little silver balls used for cake and cookie decorating.)
- 1 cup of chocolate chips - melted, this provides the glue to stick all the parts together.
- To make this as simple and mess free as possible for the children, I have found that setting out the biscuits and the ingredients in an organised manner, makes it a bit easier for them.
- We melt the choc chips in a tea cup and use a paint brush to apply the chocolate to the mint slice.
- Then press the Jaffa lightly onto the melted chocolate to stick the nose to the biscuit.
- Using the paint brush again, the children put a two little blobs of melted chocolate on the biscuit and place the cachous on gently for eyes. It is better to place the eyes close to the nose with a narrow gap, as this leaves more room to stick on the mint leaf antlers.
- Using the two halves of a mint leaf, paint the larger end of the leaf with chocolate and then stick it onto the mint slice.
- Once the antlers are on, you have your finished product! A tip with the melted chocolate is to make sure that you re-melt it through out the process, so it is a good thin consistency. Younger children also need their brushes rinsed regularly to prevent excessive build up of chocolate.
- Have fun!
More family friendly recipes
If you are looking for further recipe inspiration, check out my complete list of Family Friendly Recipes. You might like to also check out Planning With Kids Menu Planning App.
![]()
The kid friendly menu planning app allows you to:
- Create weekly menu plans quickly, choosing as many meals per day as you would like to plan for.
- Generate the shopping list for all the meals selected.
- Modify the shopping list to check off items you already have at home.
- Email the shopping list to yourself and/or others.
The most popular recipes from the blog have been included and more will be added on a regular basis. The app will notify you when new recipes have been added, so you will be able to deliver plenty of variety in your family’s menu plans. Each recipe lists the ingredients required, easy to follow instructions and a photo from the blog.